
Edition 63
Capturing Android Emulator Network Traffic with Appium
Last week, we covered how to capture network traffic generated by an iOS simulator within an Appium test. This week, we'll do the same thing with Android Emulators.
A brief recap from last week: We can start a man-in-the-middle proxy called mitmproxy which will capture all the network traffic from the emulator, and let us access the requests and responses from our test script. We can then perform advanced assertions in our test, making sure that the app is sending requests to other services as expected. We can also modify the responses, forcing the app into states we dictate, for testing purposes. For more details on proxies and why I chose mitmproxy, read the previous article.
As with last week, the example code is written in Javascript. I hope to announce a convenient way to capture network traffic with mitmproxy from Java code in a future article.
Setting up mitmproxy for Android emulators
Mitmproxy can be installed and run on Windows from within the Windows Subsystem for Linux (WSL). These instructions are for MacOS, but should work the same from WSL.
Install mitmproxy. You may need to make sure you have Python3 and pip3 installed first. Installing this way is required for the Javascript library we will be using later.
sudo pip3 install mitmproxy
And then run it:
mitmproxy
The proxy runs on localhost port 8080 by default. The empty pane it displays should fill up with network traffic once we configure our simulator to point to it.
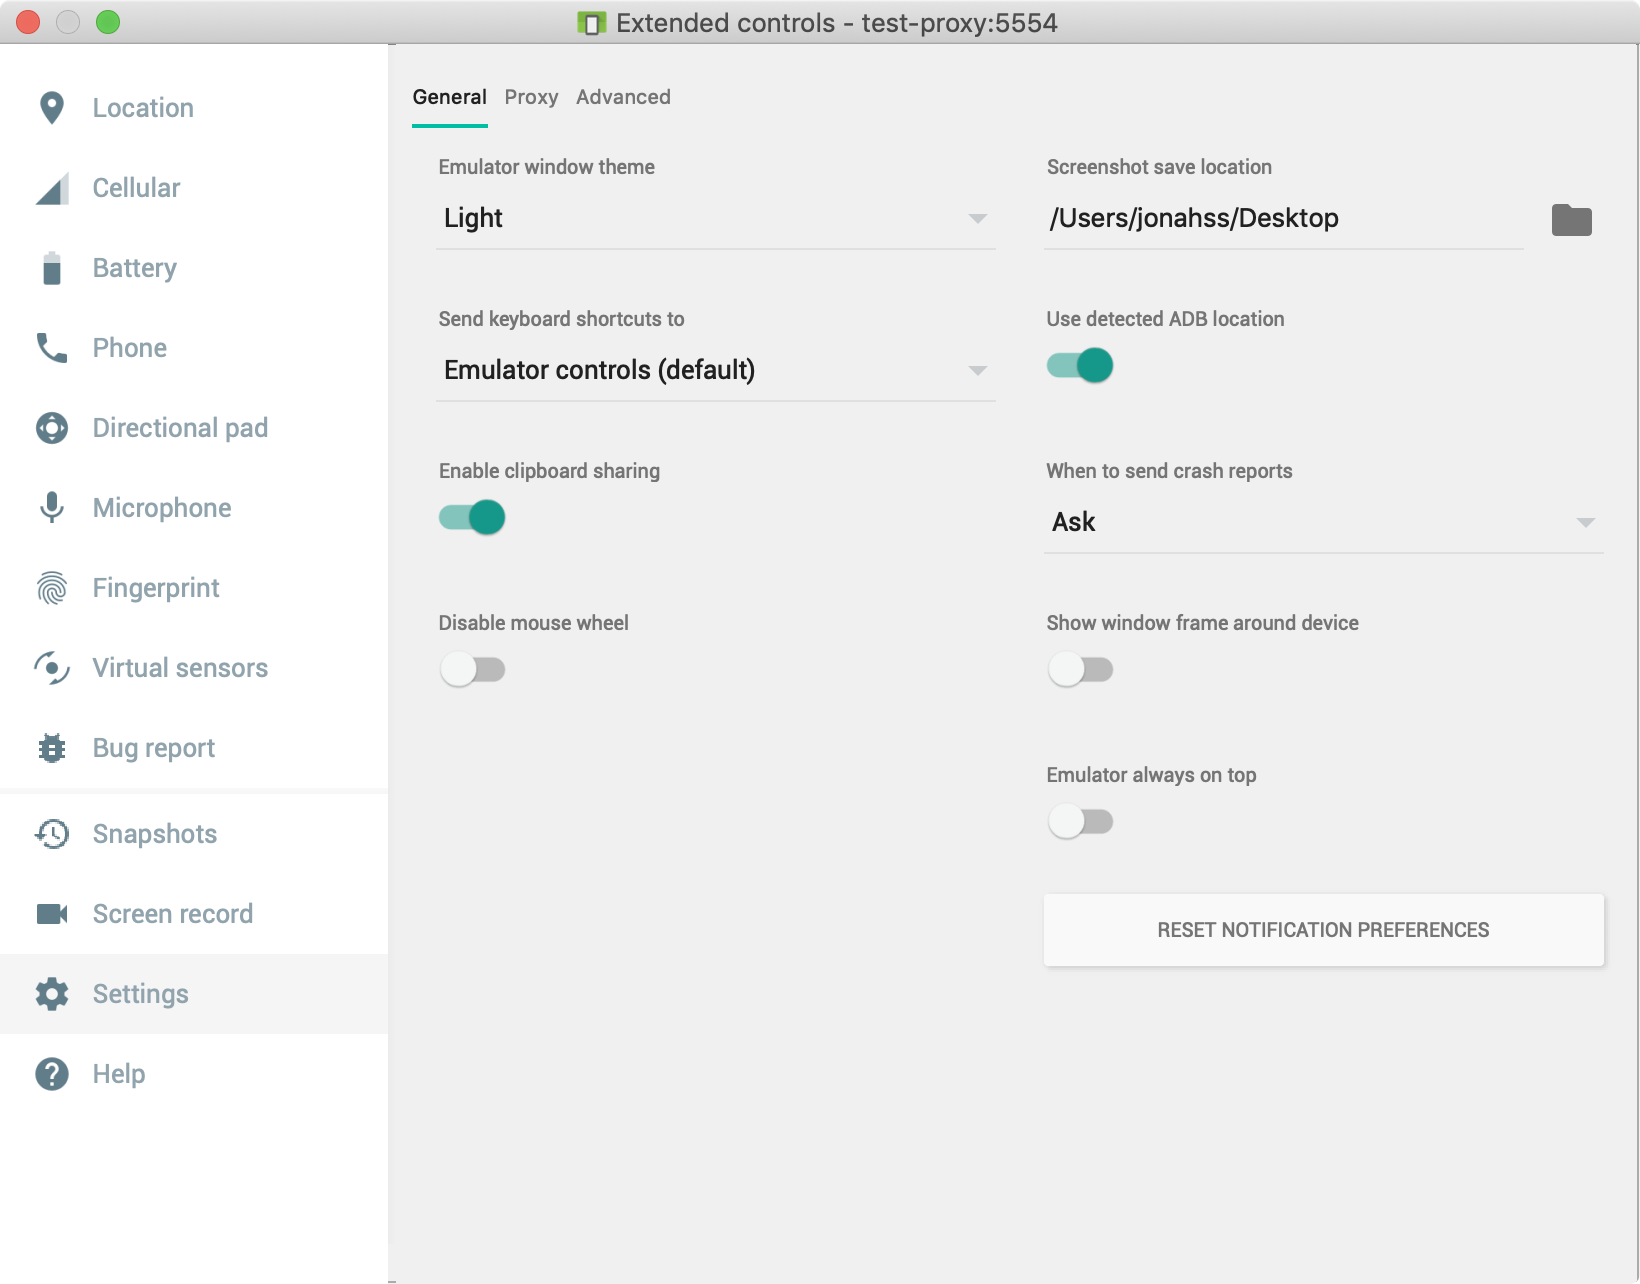
Android emulators have a built-in setting for configuring HTTP and HTTPS proxies. Start an emulator and open the emulator settings pane (not the Settings app inside the emulator). Click on the Settings tab on the left side, then the inset Proxy tab on top.
Set a "Manual Proxy Configuration" with host name http://0.0.0.0 and port 8080.
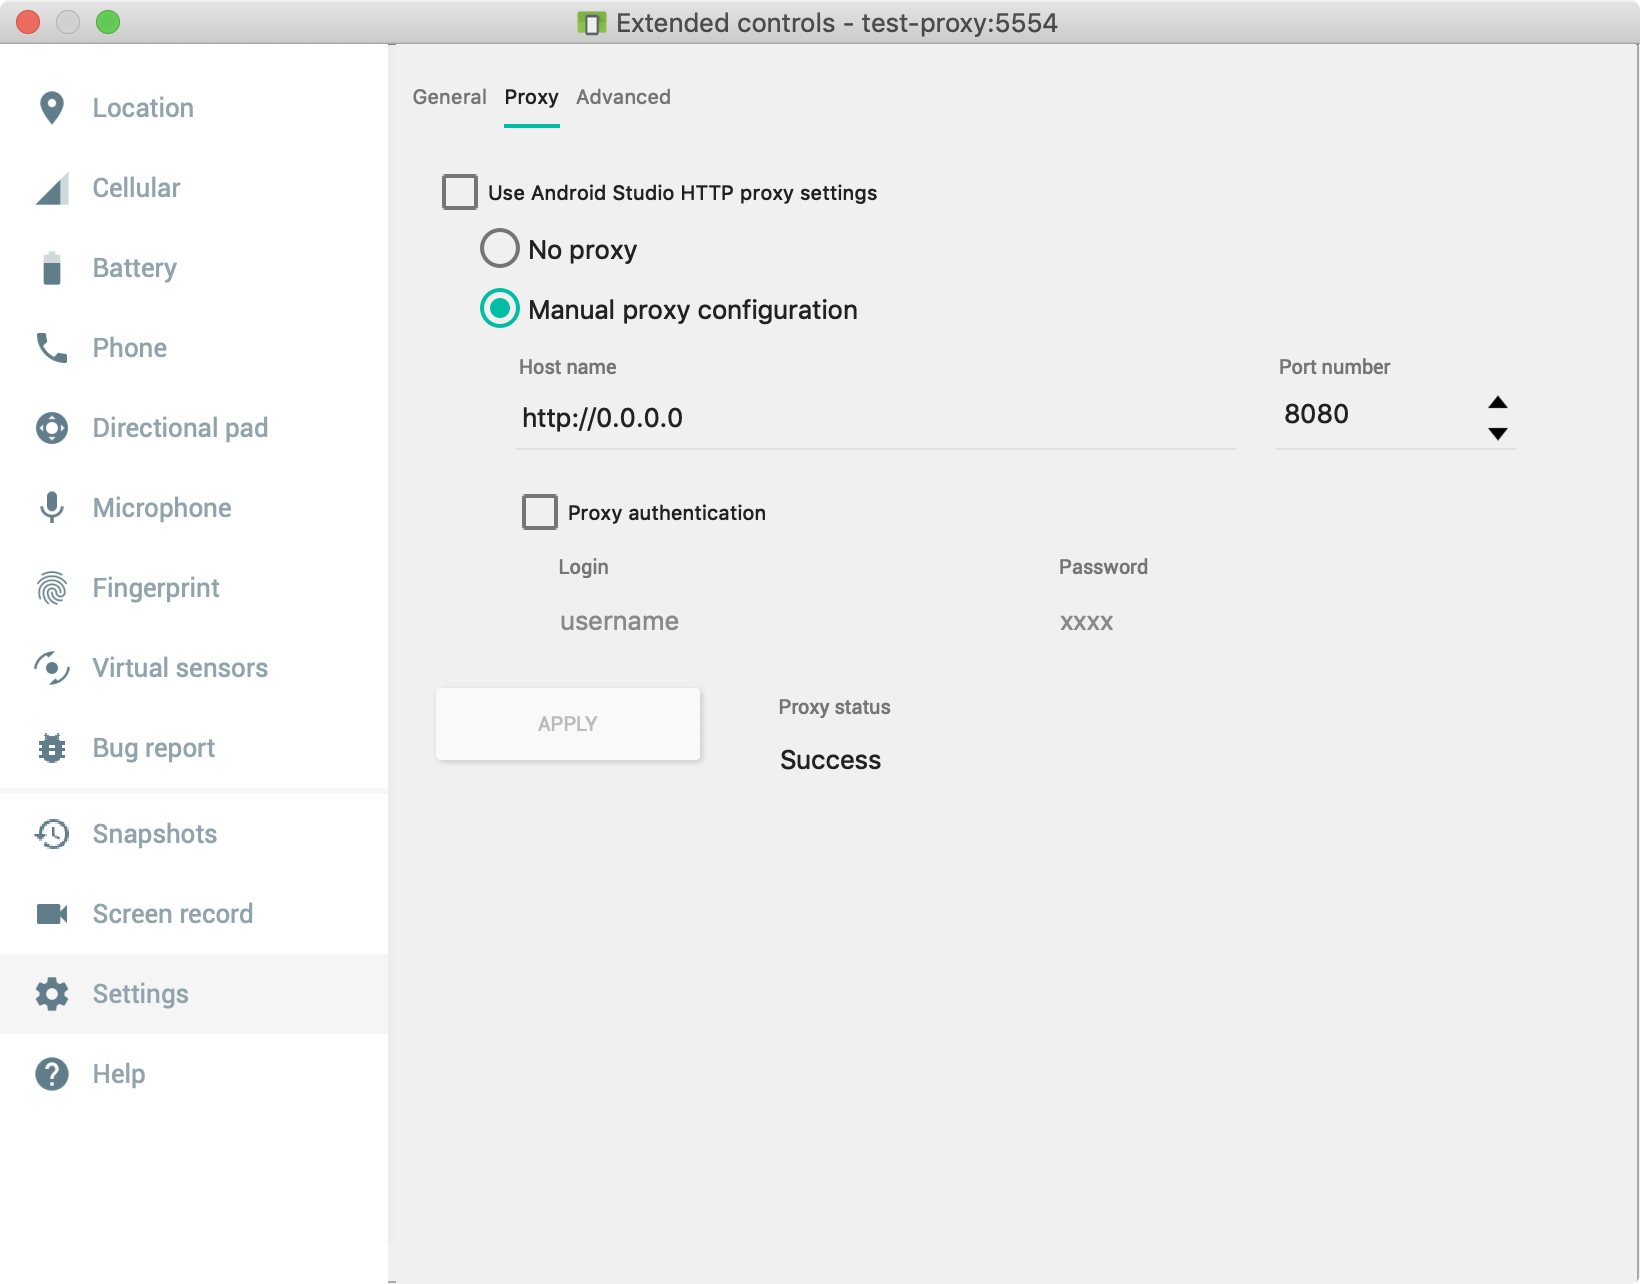
Now the emulator will try to forward all traffic through mitmproxy which we are running on the same port. To confirm that things are set up so far, open a web browser on the emulator and try to load https://appiumpro.com, the page should not load!
The reason it does not load is because mitmproxy is intercepting the request and forwarding the response, but this site uses HTTPS and mitmproxy signs each response with the special mitmproxy certificate. By default, our emulator does not trust the mitmproxy certificate, and refuses to load the page. The next step is to install and trust the mitmproxy certificate.
This is where things get a little tricky. Most of the guides you'll find online for how to set up a proxy for Android emulators will only work on Android version 6 and lower. Android version 7, "Nougat", introduced stricter security rules when it comes to installing SSL certificates. If you were to navigate to the special url hosted by mitmproxy: mitm.it and follow the instructions there for installing and trusting the mitmproxy certificate, this would only fix the web browsers on the device. You could load https://appiumpro.com in the browser, but HTTPS requests which originate from inside native apps would still be blocked. This is because the device keeps two lists of trusted certificates: user certificates and system certificates. Installing a certificate through the UI puts it into the user certificate list, but only certificates in the system list are trusted for app-based network requests.
So now we need to add the mitmproxy certificate to the system certificate list. This can only be done with root access to the device, which we have with our emulators. This process should also work on real devices that have been rooted, but you may need to find a different set of commands which works on your particular device. These instructions should work on most newer emulators.
A silver lining to this process is that installing a user certificate requires enabling the device's lock screen but this method of installing a system certificate allows us to keep the lock screen disabled.
From the commandline, perform the following:
First, launch the emulator with the -writable-system flag. This will allow us to write to the system files of the device. My AVD is named test-proxy. You'll have to insert the name of your emulator here.
emulator -avd test-proxy -writable-system &
That should boot up the emulator. Once booted, we unlock the device further:
adb root
adb remount
Let's now find our certificate file and push it to the device. The first time we ran mitmproxy, it saved its certificates to the home directory. Let's save that to a variable to use later.
ca=~/.mitmproxy/mitmproxy-ca-cert.pem
We also need to get a special hash to identify the certificate. The filename of the certificate on the emulator needs to be set as the hash of the certificate.
hash=$(openssl x509 -noout -subject_hash_old -in $ca)
If you don't have openssl installed on your computer, you can cheat and just use the value c8750f0d. The mitmproxy certificate is the same for everybody, so unless they change it in a later version, this should be fine.
hash=c8750f0d
Ok, now we install it on the device:
adb push $ca /system/etc/security/cacerts/$hash.0
And let's take adb back out of root mode, because I've found that the emulators tend to crash when restarting or lose the mitmproxy certificate unless you take this step:
adb unroot
That's it. https://appiumpro.com should load successfully on the device's browser with mitmproxy running. Requests made by native apps will be logged by the proxy as well. Take a look at the terminal where mitmproxy is running and you should see requests being logged there when you perform actions on the emulator (arrow keys scroll the mitmproxy UI).
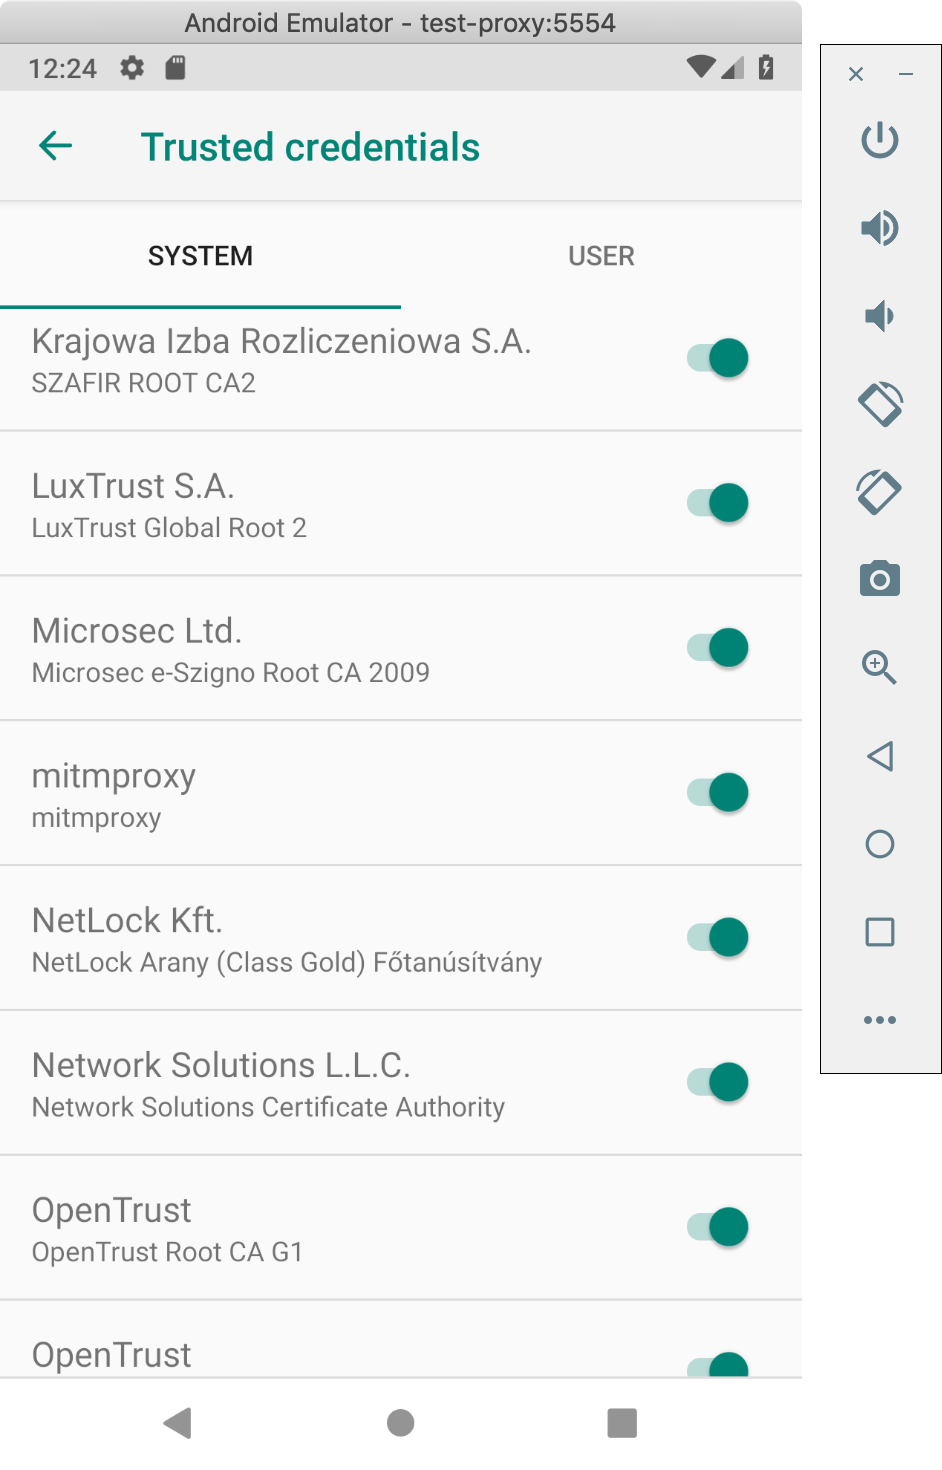
Just to double check ourselves, we can locate the mitmproxy certificate in the list of system-trusted certificates. On the device, open the settings app, select "Security & Location"->Advanced->"Encryption and Credentials"->"Trusted Credentials". Scroll down way past all the default certificates and find one named "mitmproxy" (they're in alphabetical order). Note the tabs at the top which differentiate between the "system" certificates and the "user" certificates.
If we see it there, we're ready to run our test scripts.
Automating Certificate Installation
For new emulators, the steps above need to be repeated. If you want to automate setting the device proxy, this can be done by adding a -http-proxy argument to the command for starting the emulator:
emulator -avd test-proxy -http-proxy http://0.0.0.0:8082
I also found that if you're really stuck, you can add the -debug-proxy flag and the emulator will log information about the proxy it is using:
emulator -avd test-proxy -debug-proxy -http-proxy http://0.0.0.0:8082
There is a pull request in progress to add a new desired capability to Appium which would automatically install the certificate to the device. Then most the steps here could be skipped!
Appium already has the avdArgs desired capability, which can be used to pass the -http-proxy setting when starting the emulator.
Capturing Traffic Within a Node.js Test Script
The example code for capturing Android emulator network traffic is almost identical to the iOS example. The only difference besides the necessary changes to desired capabilities, is that Android emulators seem to send requests directly to an IP address rather than a host name. Our App's code makes a request to https://history.muffinlabs.com/date/1/1 but mitmproxy captures a packet with the address: https://69.163.152.183/date/1/1. This is valid behavior but other man-in-the-middle proxies (such as BrowserMob Proxy) cannot handle traffic like this.
Let's insert code to start mitmproxy before our test, then filter and access the captured traffic so we can make assertions on it.
There are a couple different approaches to this. What I really want is the ability to programmatically start mitmproxy and access the requests within my test. Mitmproxy is designed with a nicely-featured addon framework which supports plugins written in Python. The way the designers expects you to run mitmproxy is as a standalone service, and pass python script files to it using the -s commandline flag. We could write a python addon and start/stop the proxy as a separate shell process, but I want to avoid that if I can.
Instead, I found a great little Node.js module which starts mitmproxy as a separate process and loads a special Python addon which opens a websocket connection so that we can get information in our Javascript code while the proxy is running.
The following test opens our usual demo app, TheApp, opens our pickerwheel demo, and taps the button. This action results in the app sending a request to history.muffinlabs.com which returns some historical events for the app to display.
The test starts mitmproxy and logs all requests sent by the app to an array. At the end of the test, we verify that the request we expected the app to send was indeed sent.
let test = require('ava')
let fs = require('fs-extra')
let os = require('os')
let path = require('path')
let { remote } = require('webdriverio')
let Mitmproxy = require('mitmproxy').default
let proxy, driver
let interceptedMessages = []
// this function will get called every time the proxy intercepts a request
let requestHandler = (message) => {
  let req = message.request
  console.log('************************************')
  console.log('mitmproxy intercepted a request')
  console.log(req.method)
  console.log(req.rawUrl)
  console.log(message.requestBody.toString())
  console.log('************************************')
  interceptedMessages.push(message)
}
test.before(async t => {
  // start mitmproxy
  proxy = await Mitmproxy.Create(requestHandler, [], true, true)
  driver = await remote({
    hostname: 'localhost',
    port: 4723,
    path: '/wd/hub',
    capabilities: {
      platformName: 'Android',
      platformVersion: '9',
      deviceName: 'test-proxy',
      automationName: 'UiAutomator2',
      app: '/Users/jonahss/Workspace/TheApp-v1.9.0.apk', //'https://github.com/cloudgrey-io/the-app/releases/download/v1.9.0/TheApp-v1.9.0.apk',
    },
    logLevel: 'silent'
  })
})
test('getting the event for a day, via request to history.muffinlabs.com', async t => {
  let pickerDemo = await driver.$('~Picker Demo')
  await pickerDemo.click()
  let button = await driver.$('~learnMore')
  await button.click()
  // wait for alert
  let alertIsPresent = async () => {
    try { return await driver.getAlertText(); } catch { return false; }
  }
  await driver.waitUntil(alertIsPresent, 4000)
  await driver.dismissAlert()
  t.true(interceptedMessages.length > 0)
  t.true(interceptedMessages.some(m => /https:\/\/.*\/date\/1\/1/.test(m.request.rawUrl)))
})
test.after.always(async t => {
  t.log('shutting down')
  await proxy.shutdown()
  await driver.deleteSession()
})
Modifying Network Responses Recieved By The Device
Mitmproxy allows us to get even more clever. Just changing a couple lines in the test above, we can intercept the app's request to history.muffinlabs.com and rewrite the contents of the response to contain the data of our choosing.
This can be useful in getting the app into a predictable state. The current code chooses a random historical event to display every time, but we can respond with a single event of our choosing and force the app to display what we want. We can also force the UI to display specific values, so we can test long strings, negative numbers, error states, etc, without having to actually set up the necessary context on the backend. All this can be done from the test script!
let test = require('ava')
let { remote } = require('webdriverio')
let Mitmproxy = require('mitmproxy').default
let proxy, driver
let interceptedMessages = []
// this is the response we will return from our proxy, instead of what the site usually returns
let injectedResponse = {
  date: "January 1",
  url: "https://wikipedia.org/wiki/January_1",
  data: {
    Events: [
      {
        year: "2019",
        text: "Tests Passed",
      }
    ]
  }
}
let requestHandler = (message) => {
  message.setResponseBody(Buffer.from(JSON.stringify(injectedResponse), 'utf8'))
}
test.before(async t => {
  proxy = await Mitmproxy.Create(requestHandler, [], true, true)
  driver = await remote({
    hostname: 'localhost',
    port: 4723,
    path: '/wd/hub',
    capabilities: {
      platformName: 'Android',
      platformVersion: '9',
      deviceName: 'test-proxy',
      automationName: 'UiAutomator2',
      app: 'https://github.com/cloudgrey-io/the-app/releases/download/v1.9.0/TheApp-v1.9.0.apk',
    },
    logLevel: 'silent'
  })
})
test(`insert our own event for a day, assert that it's displayed`, async t => {
  let pickerDemo = await driver.$('~Picker Demo')
  await pickerDemo.click()
  let button = await driver.$('~learnMore')
  await button.click()
  // wait for alert
  let alertIsPresent = async () => {
    try { return await driver.getAlertText(); } catch { return false; }
  }
  await driver.waitUntil(alertIsPresent, 4000)
  let alertText = await driver.getAlertText()
  await driver.dismissAlert()
  // assert that the alertText is the same as the packet we injected
  t.true(/Tests Passed/.test(alertText))
})
test.after.always(async t => {
  t.log('shutting down')
  await proxy.shutdown()
  await driver.deleteSession()
})
That's all for this week. Sample code is on github, as usual.