
Edition 54
Using Appium With Selenium Grid
During the development of your test suite, it's helpful to run tests one at a time, and on one target platform at a time. But when it comes to a production CI environment, you're definitely going to want to run your tests in parallel, with as high a concurrency as you can manage. We've already looked at how to run your Appium tests in parallel, and it involves setting up specific capabilities in your test to make sure that, for each test, Appium can instantiate an appropriate driver without stepping on the toes of the drivers running other tests.
Scaling Up Parallel Testing
This approach only scales so far, however. There's a limit to how many real or virtual devices you can run on one machine. What if you want to run 100 Appium tests in parallel? You're likely not going to be able to do that all with one Appium server. Or what if you're running a web test, and would like to make sure your testing works on desktop browsers as well as mobile devices? For that you'll need to mix in Selenium. Either way, you're eventually going to run into a situation where you need multiple automation servers running, which adds a lot of complexity to your test script. Now your test script needs to know the host and port of each server, which servers host which devices or browsers, and how to make sure it doesn't start too many tests on one server and overload its capacity. Essentially, you're dealing with an execution model that looks like this:
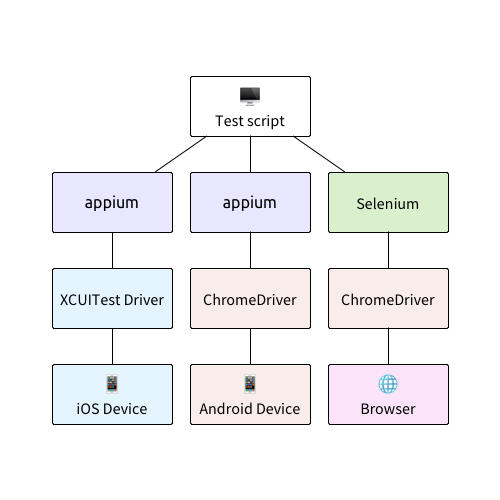
(In this example, we're trying to run a web test in parallel across Safari on iOS, Chrome on Android, and Chrome on Desktop).
Selenium Grid
Thankfully, there's a way to mitigate all this complexity, by using a special-purpose load balancer called Selenium Grid. Selenium Grid is basically a proxy server that speaks the WebDriver protocol, and manages connections to a pool of WebDriver servers. It wasn't designed specifically to work with Appium, but because Appium also speaks the WebDriver protocol (and because we taught Appium how to register with Selenium Grid), it's the best tool for DIY Appium clusters.
Here's how Selenium Grid works:
- You start a Selenium server running in "hub" mode on a certain host and port of your choosing.
- Now, you can start any number of other Selenium or Appium servers in "node" mode. You can start them anywhere you like, as long as they have network access to the grid server (the "hub").
- Each node is started with a special "node config" that describes the kinds of automation capabilities it supports.
- Now, when your test needs to start a session, you ensure it targets the grid server, and the grid server will decide which node to use for the session. You don't need to know or care about where the nodes are located. As long as your test specifies capabilities which the hub can match to a free node, your test will run.
In other words, I've been describing a model that looks more like this:
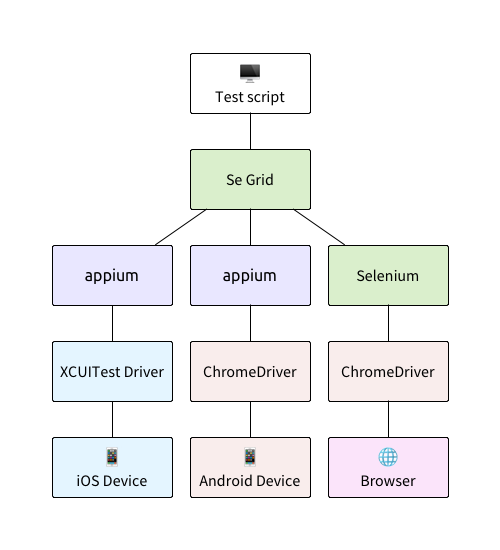
Beyond the simplicity of needing to know only about one test server, the Selenium Grid model is particularly nice for Appium, because Appium drivers also require a number of system resources (unique ports, etc...). On the Grid model, you can start each Appium server independently, with a predefined set of ports or the like, using the --default-capabilities flag. So, for example, I could start a set of Appium servers like this, also using the --nodeconfig flag to tell Appium it should connect with Selenium Grid:
appium --default-capabilities='{"wdaLocalPort": 8100}' --nodeconfig=/path/to/nodeconfig.json
appium --default-capabilities='{"wdaLocalPort": 8200}' --nodeconfig=/path/to/nodeconfig.json
Now each of these Appium servers will be registered with the Selenium Grid, and each server has declared which wdaLocalPort it needs; now my test script doesn't have to know or care about this! It becomes an ops step, which makes much more sense.
Node Config
The magic pretty much all happens in the "node config" file, which is defined as JSON. There are a lot of nodeconfig options to choose from, but here's an example of the config I'll be using for the Safari-on-iOS node in this guide:
{
  "capabilities":
  [
    {
      "deviceName": "iPhone 8",
      "platformVersion": "11.4",
      "maxInstances": 1,
      "platformName": "iOS",
      "browserName": "Safari"
    }
  ],
  "configuration":
  {
    "cleanUpCycle":2000,
    "timeout":30000,
    "proxy": "org.openqa.grid.selenium.proxy.DefaultRemoteProxy",
    "maxSession": 1,
    "register": true,
    "registerCycle": 5000,
    "hubPort": 4444,
    "hubHost": "127.0.0.1",
    "hubProtocol": "http"
  }
}
Let's take a look at some of the important configuration keys:
capabilities: the set of capabilities supported by this node. Can be a list. In this case, the node is only supporting one type of device. Note that in addition to the capabilities you're used to seeing, you can specify how many of a particular capability set the node should be allowed to start, viamaxInstances.proxy: the proxy logic to be used for communicating with this node. You can write a custom proxy if desired.maxSession: the total number of sessions this node can run. This is useful in combination withmaxInstances. For example, let's say we can run a total of 5 iPhone 8s and 5 iPhone 6s on this node, but the system gets overloaded when running more than 8 sessions at a time, of any kind. Then we'd setmaxInstancesto5for each device type, butmaxSessionto8, so that we never try to run the theoretical max of 10.hubHost,hubPort, andhubProtocol: the connection details for the Grid hub server
Starting Up the Grid
That's basically all you need to know about how Selenium Grid works with Appium. So let's dive into a working example. What we want to end up with is parallel execution of one web test, across Safari on iOS, Chrome on Android, and Chrome on Desktop (just like in the diagrams above).
- Make sure you've downloaded the latest Selenium server (I'm on 3.141.59 for this guide).
- Make sure you've got the latest Chromedriver, so that Chrome desktop automation works (I'm on 2.45).
- Make sure you've got an Android emulator up and running with the latest version of the Chrome browser on it (I'm using v71).
- Open up 4 separate terminal windows (we're going to run the Grid hub server in one, and the 3 nodes in the others). Here's what to run in the 4 windows (in all cases, replace the paths with appropriate paths for your system):
# Window 1: the Grid hub
java -jar /path/to/selenium-server-standalone.jar -role hub
# Window 2: the iOS node
appium -p 4723 --nodeconfig /path/to/nodeconfig-ios.json
# Window 3: the Android node
appium -p 4733 --nodeconfig /path/to/nodeconfig-android.json
# Window 4: the Chrome desktop node
java -Dwebdriver.chrome.driver="/path/to/chromedriver" -jar /path/to/selenium-server-standalone.jar -role node -nodeConfig /path/to/nodeconfig-chrome.json
Here are the contents of the nodeconfig JSON files (in addition to nodeconfig-ios.json, which is above). (You can also download them from the Appium Pro repo on GitHub).
nodeconfig-android.json:
{
  "capabilities":
  [
    {
      "browserName": "Chrome",
      "platformVersion": "26",
      "maxInstances": 1,
      "platformName": "Android",
      "automationName": "UiAutomator2",
      "deviceName": "Android Emulator"
    }
  ],
  "configuration":
  {
    "cleanUpCycle":2000,
    "timeout":30000,
    "proxy": "org.openqa.grid.selenium.proxy.DefaultRemoteProxy",
    "maxSession": 1,
    "register": true,
    "registerCycle": 5000,
    "hubPort": 4444,
    "hubHost": "127.0.0.1",
    "hubProtocol": "http"
  }
}
nodeconfig-chrome.json:
{
  "capabilities":
  [
    {
      "browserName": "chrome",
      "browserVersion": "71",
      "platformName": "MAC",
      "maxInstances": 1
    }
  ],
  "cleanUpCycle":2000,
  "timeout":30000,
  "proxy": "org.openqa.grid.selenium.proxy.DefaultRemoteProxy",
  "maxSession": 1,
  "register": true,
  "registerCycle": 5000,
  "hubPort": 4444,
  "hubHost": "127.0.0.1",
  "hubProtocol": "http"
}
This is all the setup we need! In a real production CI environment, you'd probably have this all automated and potentially registering lots more nodes across many different physical or virtual servers. Anyway, once you've got everything up and running, you should see messages in the Selenium Grid console to the effect that several nodes have checked in:
13:48:04.514 INFO [DefaultGridRegistry.add] - Registered a node http://0.0.0.0:4733
Running Tests on the Grid
Because our test project is Gradle-based, our best option for running in parallel is to use maxParallelForks (as described in Edition 28, along with instructions for Maven-based projects). Here's how I've updated my build.gradle to that end:
test {
    maxParallelForks = 3
    forkEvery = 1
}
This will cause Gradle to create a new thread for each test class. Unfortunately, a consequence is that for real parallelism, we need to have separate test classes, not just separate methods within one test. For that reason, this example includes 4 Java files: one as a base test class for shared code, and 3 platform-specific classes, so that they can be run in parallel. Here's the base class:
public class Edition054_Selenium_Grid {
    protected RemoteWebDriver driver;
    static String HUB_URL = "http://localhost:4444/wd/hub";
    private static By loginBtn = By.tagName("button");
    private static By username = By.id("username");
    private static By password = By.id("password");
    private static By message = By.id("flash");
    private static String LOGIN_URL = "https://the-internet.herokuapp.com/login";
    private static String ERR_MSG = "Your username is invalid!";
    @After
    public void tearDown() {
        if (driver != null) {
            driver.quit();
        }
    }
    protected void actualTest(RemoteWebDriver driver) {
        WebDriverWait wait = new WebDriverWait(driver, 10);
        driver.navigate().to(LOGIN_URL);
        wait.until(ExpectedConditions.presenceOfElementLocated(username))
            .sendKeys("foo");
        driver.findElement(password).sendKeys("bar");
        driver.findElement(loginBtn).click();
        String errText = wait.until(ExpectedConditions.presenceOfElementLocated(message)).getText();
        Assert.assertThat(errText, Matchers.containsString(ERR_MSG));
    }
}
As you can see, it contains the actual test logic we want to execute, which attempts a login on The Internet and checks that the login fails. The only real item of interest here is that we have saved a reference to the Grid hub server, running on the default port 4444. This is what each test class will use to connect to the Grid hub.
And here are the three platform-specific classes:
public class Edition054_Selenium_Grid_IOS extends Edition054_Selenium_Grid {
    @Test
    public void testIOS() throws MalformedURLException {
        DesiredCapabilities caps = new DesiredCapabilities();
        caps.setCapability("platformName", "iOS");
        caps.setCapability("platformVersion", "11.4");
        caps.setCapability("deviceName", "iPhone 8");
        caps.setCapability("browserName", "Safari");
        driver = new RemoteWebDriver(new URL(HUB_URL), caps);
        actualTest(driver);
    }
}
public class Edition054_Selenium_Grid_Android extends Edition054_Selenium_Grid {
    @Test
    public void testAndroid() throws MalformedURLException {
        DesiredCapabilities caps = new DesiredCapabilities();
        caps.setCapability("platformName", "Android");
        caps.setCapability("deviceName", "Android Emulator");
        caps.setCapability("automationName", "UiAutomator2");
        caps.setCapability("browserName", "Chrome");
        driver = new RemoteWebDriver(new URL(HUB_URL), caps);
        actualTest(driver);
    }
}
public class Edition054_Selenium_Grid_Desktop extends Edition054_Selenium_Grid {
    @Test
    public void testDesktop() throws MalformedURLException {
        DesiredCapabilities caps = new DesiredCapabilities();
        caps.setCapability("browserName", "chrome");
        caps.setCapability("browserVersion", "71");
        caps.setCapability("platformName", "MAC");
        driver = new RemoteWebDriver(new URL(HUB_URL), caps);
        actualTest(driver);
    }
}
The only responsibility for these classes is to get the right capabilities set up, instantiate a driver with them, and kick off the actual test. With each of these classes set up in their own files appropriately, I can now use a gradle command to run my test suite in parallel:
./gradlew :cleanTest :test --tests "Edition054_Selenium_Grid.Edition054_Selenium_Grid_*"
(The * helps me select all the test classes I care about for this example, and not other ones).
At this point, all three tests are started simultaneously, and Selenium Grid forwards each session to the appropriate node. The result is that all the tests execute at the same time (though on my machine, the Chrome Desktop test ends much faster than the other two)!
Wrap-up
Selenium Grid, and distributed parallel testing in general, is a deep topic, and this guide could only cover the basic cases. But what we've shown is enough to use to get a test grid of basically any size up and running, potentially even mixing and matching mobile and desktop testing as well.
What you'll no doubt find as you get into setting up your own Grid is that, fabulous as Selenium Grid itself may be, there's an awful lot of maintenance associated with running the various nodes! That's one reason that there are, nowadays, a number of options for running your Appium tests in parallel in the cloud, and it's important to try solutions like these out before going all-in on an in-house Grid setup, so you can do appropriate cost-benefit analysis for your team.