
Edition 74
Automating Custom IoT Devices With Appium, Part 1
This article is the first in a two-part series on using Appium with platforms very different from mobile operating systems. You can also read part two.
In my AppiumConf 2019 opening keynote, I made some appropriately broad and keynotey comments about the state of automated test problems and techniques. But really, this was all just setup, designed to demonstrate a single point: Appium is first and foremost a set of code interfaces that make it easy to bring Webdriver-style automation to any platform.
Over the years, I've been thinking a bit about what odd platforms are out there that we could automate with Appium, and one that's kept coming to mind is "IoT". IoT of course is a vague term, and can refer to lots of types of applications. One constant for definitions of IoT is that it involves some kind of physical connection to the world. IoT devices aren't just software---they're a combination of software and some kind of special-purpose hardware (usually connected to the Internet, as the term implies). This hardware has interface points with software, but crucial to its existence is some kind of physical input and/or output.
How on earth would we test such a thing? Well, one part is easy: figuring out to cast automation behaviors with the device in terms of Webdriver commands. A few years ago, I imagined what an Appium test for an X-Wing might look like:

Pretty much any interface, virtual or physical, can be cast in terms of elements and interactions with them. So the real question is, how do you turn Webdriver commands into actual behaviors for a piece of hardware? That is the subject of this series, and in the second part we will answer that question directly. For this first part, we need to first develop the "app under test" to prove out the whole idea. In other words, we need to build ourselves a physical device that we will then write an Appium test for later on.
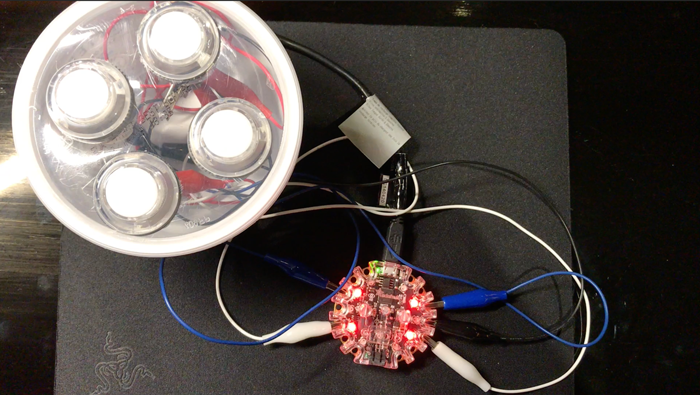
The device we'll build is pictured at the top, and it is a drum machine! Here are the requirements for this "app" (device):
- It should have 4 buttons as input
- It should make 4 sounds as output---one sound corresponding to each button
- Sounds should be sent along an audio cable for use with headphones or speakers
- As additional feedback, there should also be visual (LED) output whenever a button is pressed
That's exactly how this little machine works. Here's a GIF of it in action (of course, you'll have to imagine the sound---and believe me that your imagination will be better than the quality of the actual samples):
And here's how we build it:
- Buy an Adafruit Circuit Playground Express (CPX). This is the microcontroller that will be in charge of detecting button presses, playing audio, and even choosing when to turn an LED from red to green.
- Buy 4 large buttons (these ones include LEDs but we will not use that functionality), a bunch of alligator clips, and a 1Kohm resistor (or potentiometer).
- Hook up each button to a ground pad on the CPX, and the button lead to one of the input pads on the CPX (I used A1, A2, A5, and A6).
- Take a wire from AO (audio out) to the resistor, and from the resistor to your headphone jack (make sure it touches either side of the outermost separator, in other words, touching both of the outermost metal areas). Take another wire from a ground pad on the CPX to the innermost metal segment on your headphone jack.
Now that it's all built, we need to give it some brains! Ensure that your CPX has been set up to work with CircuitPython. Then, check out the source files which need to be copied to the CPX (using rsync or simply drag-and-drop). Once the code is copied, the CPX will reboot, and you should have a functional drum machine!
This drum machine is not so good, and has a bunch of limitations. It can only play one sound at a time, so you can't hit the bass and the cymbal simultaneously, for example. The sound quality is ridiculously bad. But it works!
The only thing left to understand in this part of the series is what the "app code" looks like. You can see that there are first of all 4 WAV files, corresponding to the sounds produced by the button. The code itself lives in code.py:
from adafruit_circuitplayground.express import cpx
from digitalio import DigitalInOut, Direction, Pull
import audioio
import board
INPUTS = [
    {'board': board.A1, 'pixel': 6, 'drum': 'kick-8'},
    {'board': board.A2, 'pixel': 8, 'drum': 'snare-8'},
    {'board': board.A5, 'pixel': 1, 'drum': 'hihat-8'},
    {'board': board.A6, 'pixel': 3, 'drum': 'hitom-8'},
]
def play_file(filename):
    wave_file = open(filename, "rb")
    with audioio.WaveFile(wave_file) as wave:
        with audioio.AudioOut(board.A0) as audio:
            print("playing %s" % filename)
            audio.play(wave)
            while audio.playing:
                pass
def init():
    for input_spec in INPUTS:
        pin = DigitalInOut(input_spec['board'])
        pin.direction = Direction.INPUT
        pin.pull = Pull.UP
        input_spec['pin'] = pin
    cpx.pixels.brightness = 0.1
init()
while True:
    for input_spec in INPUTS:
        if input_spec['pin'].value:
            cpx.pixels[input_spec['pixel']] = (255, 0, 0)
        else:
            cpx.pixels[input_spec['pixel']] = (0, 255, 0)
            play_file("%s.wav" % input_spec['drum'])
The important things to note here are:
- We are using an Adafruit-specific library to gain access to a bunch of helpful functionality. This is how we easily turn WAV files into electrical outputs, or control the LEDs. Without this built-in library, our project would be much harder.
- We keep the code clean and general by defining a mapping of input pads, sounds, and LED identifiers.
- The code runs in an infinite loop. On each iteration of the loop, we simply check whether a button is pressed (i.e.,
input_spec['pin'].valueis False, meaning the button has broken the circuit by being pressed down). If so, we set the corresponding LED to green, and play the corresponding WAV file.
That's it! In less than 50 lines of code, and without breaking the bank (this setup cost around $50USD, but of course all the parts are reusable for other projects), we've built our very own light-animated drum machine! You can see that I chose to "mount" my drum machine in a used yogurt container. You might choose something more classy---that's up to you. Be sure to check out Part 2 of this series to see how we tackle the challenge of writing Appium tests for this custom hardware device.