Edition 32
Finding Elements By Image, Part 1
One of the unfortunate realities of mobile automation is that not every UI element is automatable in practice! This could be because the element is built from a custom class with no accessibility or automation support. It could be because there's no uniquely identifying locator strategy and selector that can be applied to the element (think of a dynamic list view where all the items look the same from the perspective of the automation engine, but different to a real user). Or imagine a 2D or 3D game with no traditional UI controls at all---just pixels painted by a rendering engine!

Historically, Appium hasn't tried to support these use cases, and has stuck to offering support via the XCUITests and UiAutomator2s of the world. If they couldn't find an element, Appium couldn't find an element.
There is, however, a pretty big hammer out there that could potentially be used to solve this problem. Rather like the sword of Damocles (the hammer of Damocles?) it's been hanging over the heads of the Appium developers for some time. Should we use it? Or shouldn't we? This big hammer is visual element detection. It's a big hammer because it uses visual features to detect elements for the purpose of interacting with them. This is exactly the same strategy that human users typically use, and therefore works no matter the kind of application and no matter whether a developer remembered to put a test ID on a particular element.
The Appium team finally decided to bite the bullet and support a small set of visual detection features, which are available as of Appium 1.9.0. In this article, we'll take a look at the most common use case for these features, namely image element finding. (In Part 2 of this series, we'll look at advanced methods for modulating this feature, but for now we'll stick to the basics).
What is an image element? An image element looks to your client code exactly like any other element, except that you've found it via a new -image locator strategy. Instead of a typical selector (like "foo"), the strings used with this new locator strategy are Base64-encoded image files. The image file used for a particular find action represents a template image that will be used by Appium to match against regions of the screen in order to find the most likely occurrence of the element you're looking for.
This does mean that you have to have an image on hand that matches what you want to find in the app, of course. How does Appium use this image to find your element? Under the hood, we rely on the OpenCV library to find areas of the screenshot that most closely match your reference/template image. OpenCV is pretty sophisticated, and the match will succeed even despite a variety of differences between the screen and your reference image---for example differences in rotation or size.
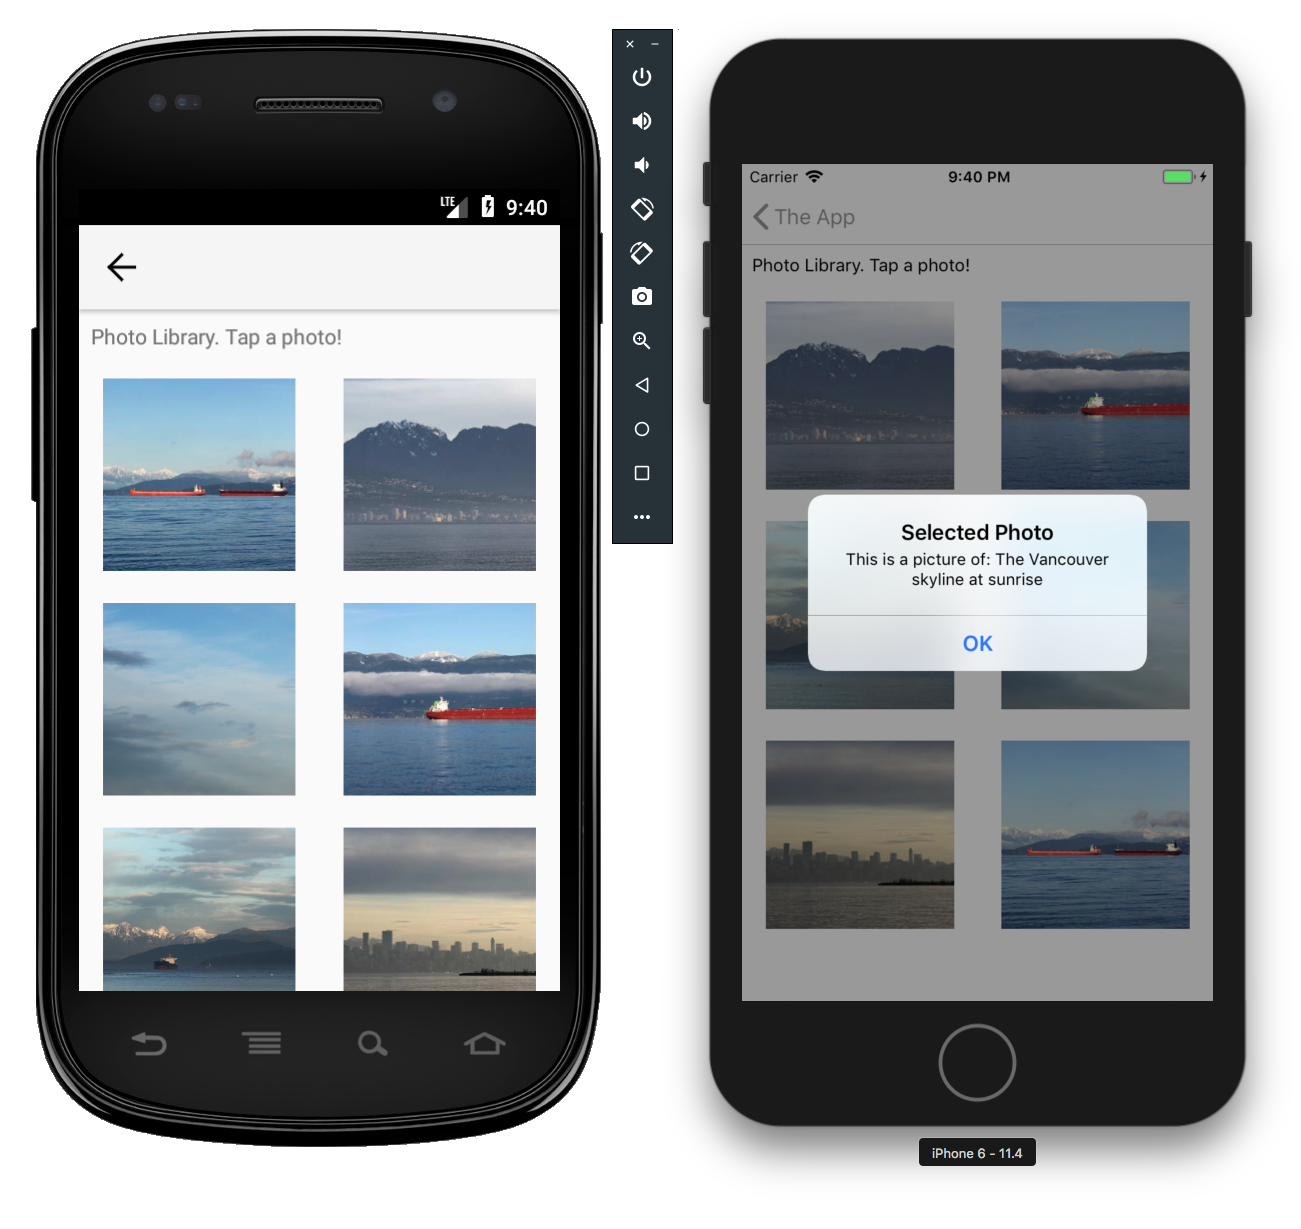
Ready for an example? Let's dive in. This is a brand-new feature and both client and server behavior are a little rough around the edges. It works pretty magically, though! For the app side of things, I've created a new feature in The App which is a list of photos, displayed in some random order. When you tap on a photo, an alert pops up with a description of that photo, as in the image below:

Without image matching, this would be an impossible scenario to automate. None of the images have any identifying information in the UI tree, and their order changes every time we load the view, so we can't hardcode an element index if we want to tap a particular image. Find-by-image to the rescue! Actually using this strategy is the same as finding an element using any other strategy:
WebElement el = driver.findElementByImage(base64EncodedImageFile);
el.click();
Once we have an image element, we can click it just like any other element as well. (There are a few other commands that work on image elements, but obviously most common actions are unavailable---sendKeys, for example. This is because we don't actually have a reference to an actual UI element, just the region of the screen where we believe the element to be located).
Of course, for this to work we have to have a Base64-encoded version of our image file. In Java 8 this is pretty straightforward:
// assume we have a File called refImgFile
Base64.getEncoder().encodeToString(Files.readAllBytes(refImgFile.toPath()));
That's really all there is to it! One great thing is that finding elements by image supports both implicit and explicit wait strategies, so your tests can robustly wait until your reference image matches something on the screen:
By image = MobileBy.image(base64EncodedImageFile);
new WebDriverWait(driver, 10)
  .until(ExpectedConditions.presenceOfElementLocated(image)).click();
Putting it all together, we can now write a successful test for the scenario above: navigating to the Photo view of The App, tapping the exact photo we want, and verifying that we tapped the image by evaluating text which shows up subsequently. To find the photo, we use the reference template below:

Here's the relevant code (omitting the boilerplate for now):
private String getReferenceImageB64() throws URISyntaxException, IOException {
    URL refImgUrl = getClass().getClassLoader().getResource("Edition031_Reference_Image.png");
    File refImgFile = Paths.get(refImgUrl.toURI()).toFile();
    return Base64.getEncoder().encodeToString(Files.readAllBytes(refImgFile.toPath()));
}

public void actualTest(AppiumDriver driver) throws URISyntaxException, IOException {
    WebDriverWait wait = new WebDriverWait(driver, 10);

    try {
        // get to the photo view
        wait.until(ExpectedConditions.presenceOfElementLocated(photos)).click();

        // wait for and click the correct image using a reference image template
        By sunriseImage = MobileBy.image(getReferenceImageB64());
        wait.until(ExpectedConditions.presenceOfElementLocated(sunriseImage)).click();

        // verify that the resulting alert proves we clicked the right image
        wait.until(ExpectedConditions.alertIsPresent());
        String alertText = driver.switchTo().alert().getText();
        Assert.assertThat(alertText, Matchers.containsString("sunrise"));
    } finally {
        driver.quit();
    }
}
In the example above you can see a helper function I wrote to get the Base64-encoded version of our reference image, which I have stored as a resource file in the project. Your technique for getting the reference image into your project might differ, of course.
In Part 2 of this series, we take a look at some of the special parameters which are available to help with finding image elements. Check it out! Also, have a look at the full code sample. Note that to run this successfully, you'll need to make sure you're pulling the latest Appium Java client from source (see build.gradle in the project, and at least Appium 1.9.0).
