
Edition 14
How to Automate a Pop Rock Band
The first-ever AppiumConf was held recently (April 6 2018), and it was a landmark event for the Appium community, bringing together Appium users and developers from all over the world. It was full of interesting talks, so do check out the full talk recordings or read my conference recap to get a feel for the event.
I had the privilege of closing out the day with a final session, and I wanted to do something special for this inaugural conference. So, I decided to showcase Appium's automation abilities, not for the purpose of testing, but as part of a provocative musical performance, merging my loves for code, music, and philosophy into one experience. If you're not sure what I'm talking about, just watch the demo portion of my talk before reading further.
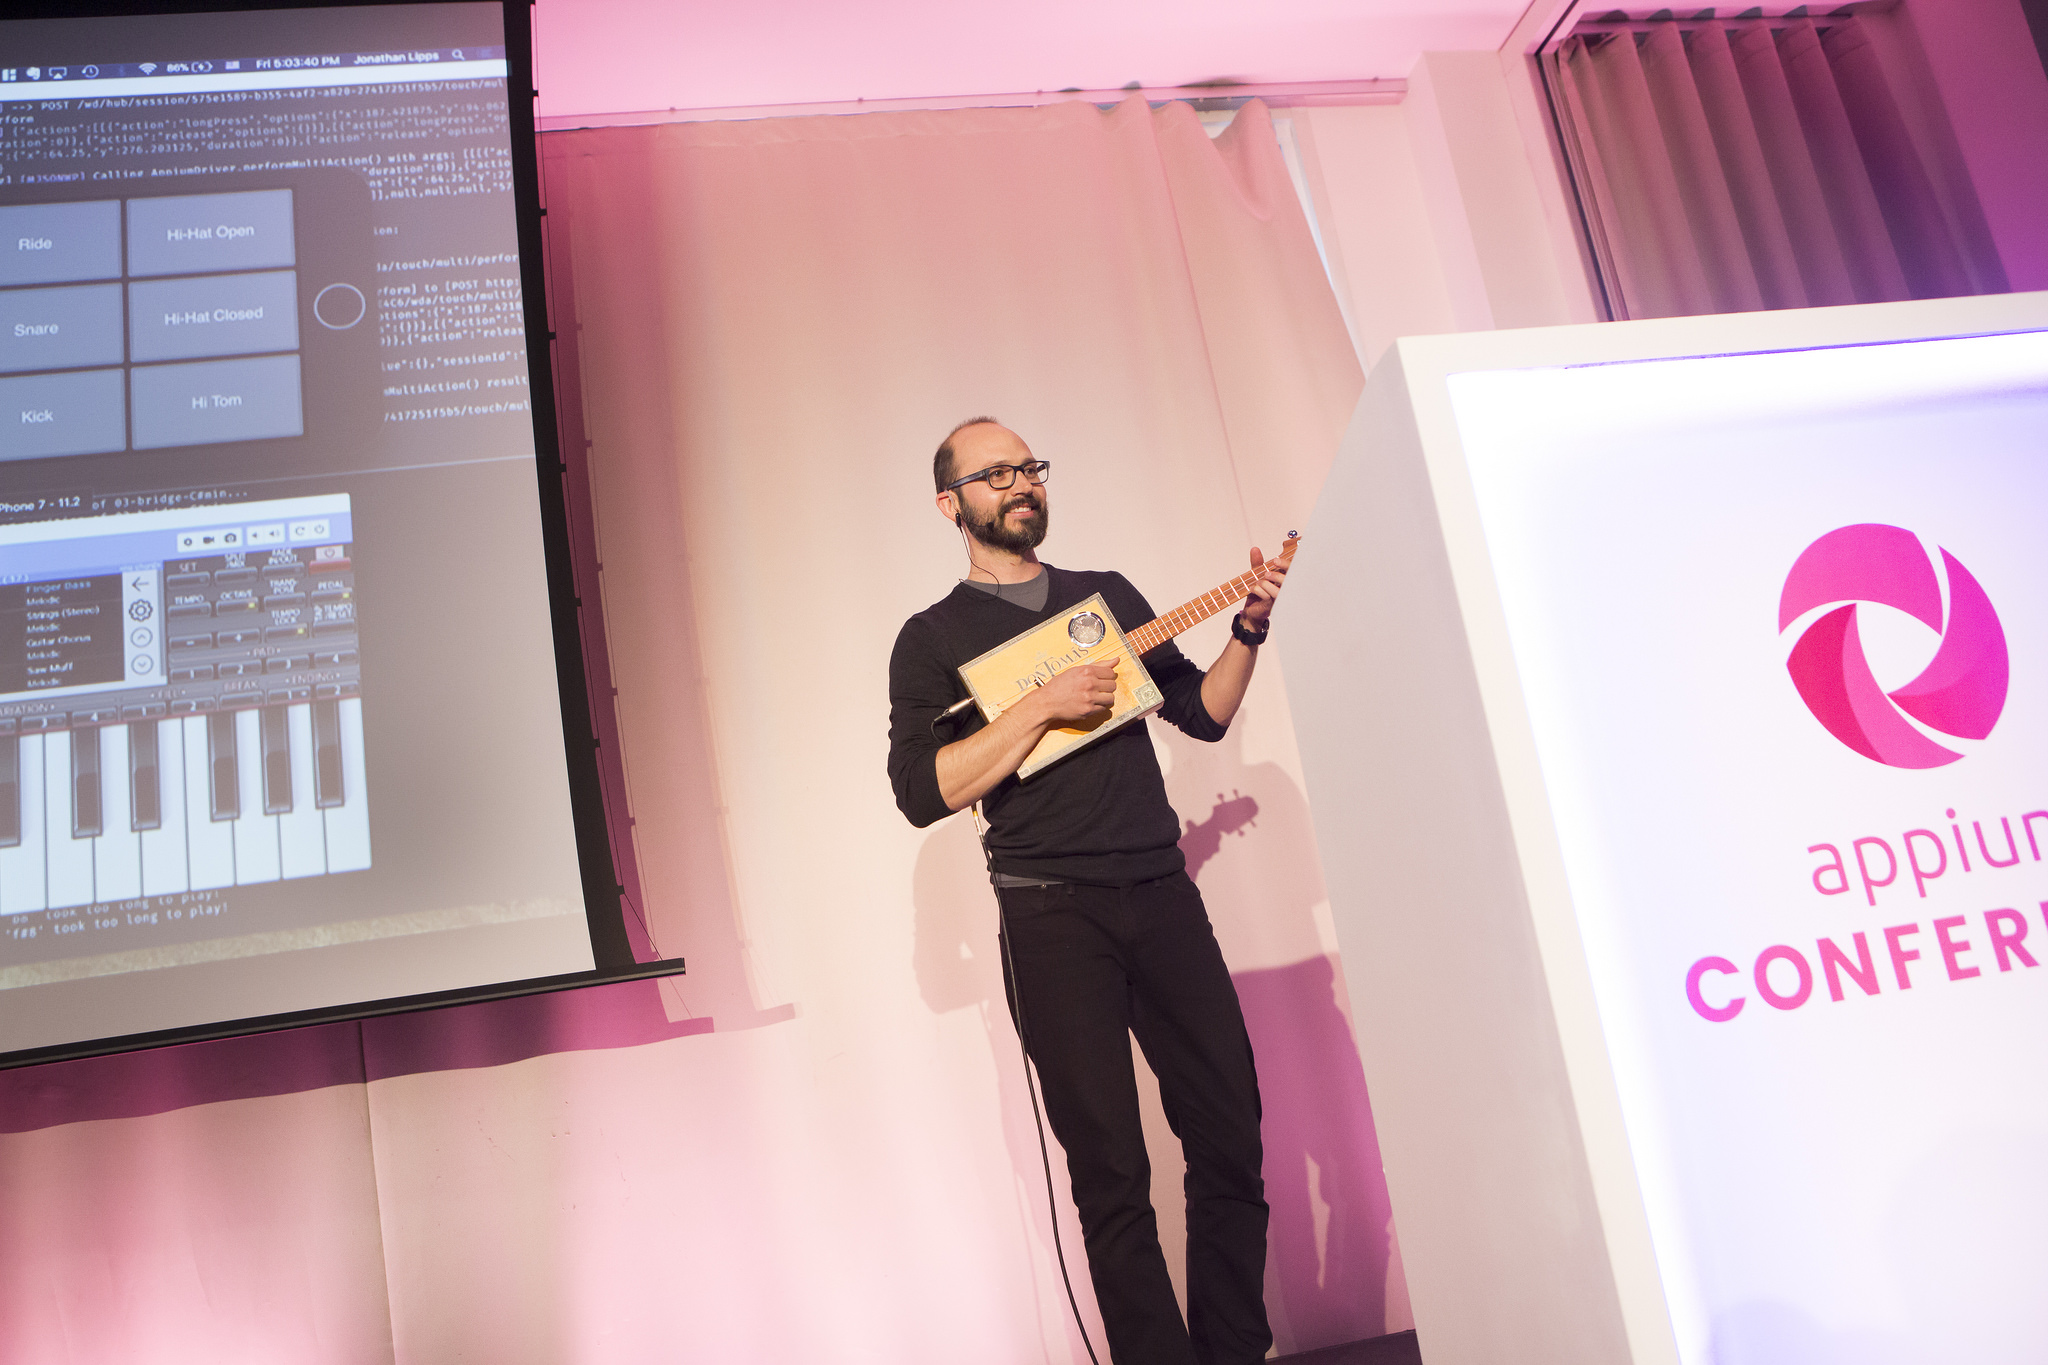
In this edition of Appium Pro, I thought we would have some fun together, go behind the scenes of my demo, and answer the question, "How do you automate a pop rock band with Appium?"
(Apologies in advance to those of you who are used to seeing Java for the code snippets; this week they will be in JS, since that's my language of choice for hacking, and the language I wrote my demo in).
Step 1: Write a Song
It goes without saying that no band can do anything without a song, whether it's a band of human beings or software instruments played by software robots. To write a song, it helps to know something about music, so that might be the place for some of you to start, namely learning to play an instrument or reading up on some music theory. It's not absolutely necessary to add a vocal melody and lyrics, but it's a pretty core piece of most pop music, so it doesn't hurt to engage your brain's right hemisphere and get poetic.
(I certainly encourage lyrics that explore the unforeseen tribulations of a post-human techno-reality, ironically layered on top of positive ukulele-driven pop-rock, but of course you're not limited to that. In fact, now that I think about it, I don't know if there's room enough in the ironic-post-human-techno-critic genre for the both of us!)
If you've never written a song before, it's helpful to break it down into its constituent parts, just like approaching any other problem. Focus on one thing at a time, and layer ideas and instruments in harmonious ways until the whole is greater than the sum of the parts. Most pop songs have 2-4 themes (by "theme" I mean chord sequences and melody lines that recur throughout the song). If you can come up with a verse, a chorus, and a bridge, for example, you're all set. Make the chorus the most catchy and interesting part. Just go back and forth between these themes in some order or another for 3-4 minutes and you're good to go. Oh, and you'll need a title. I already picked "Ghost in the Machine", so you can't have it!
At the end of this step, you'll have a nice arrangement of your tune, ready to be played by all the instruments you want to include (for example, I chose ukulele, voice, electric guitar, bass, and drums, but you don't need that many). I also chose to record the song with real instruments at this point, because I liked it enough I wasn't going to be satisfied with Appium's shoddy timekeeping, and I wanted a fun party favor to give the conference attendees. (It's OK, Appium Pro readers, you can listen to it too).

Step 2: Find (or Make) Your Mobile Instruments
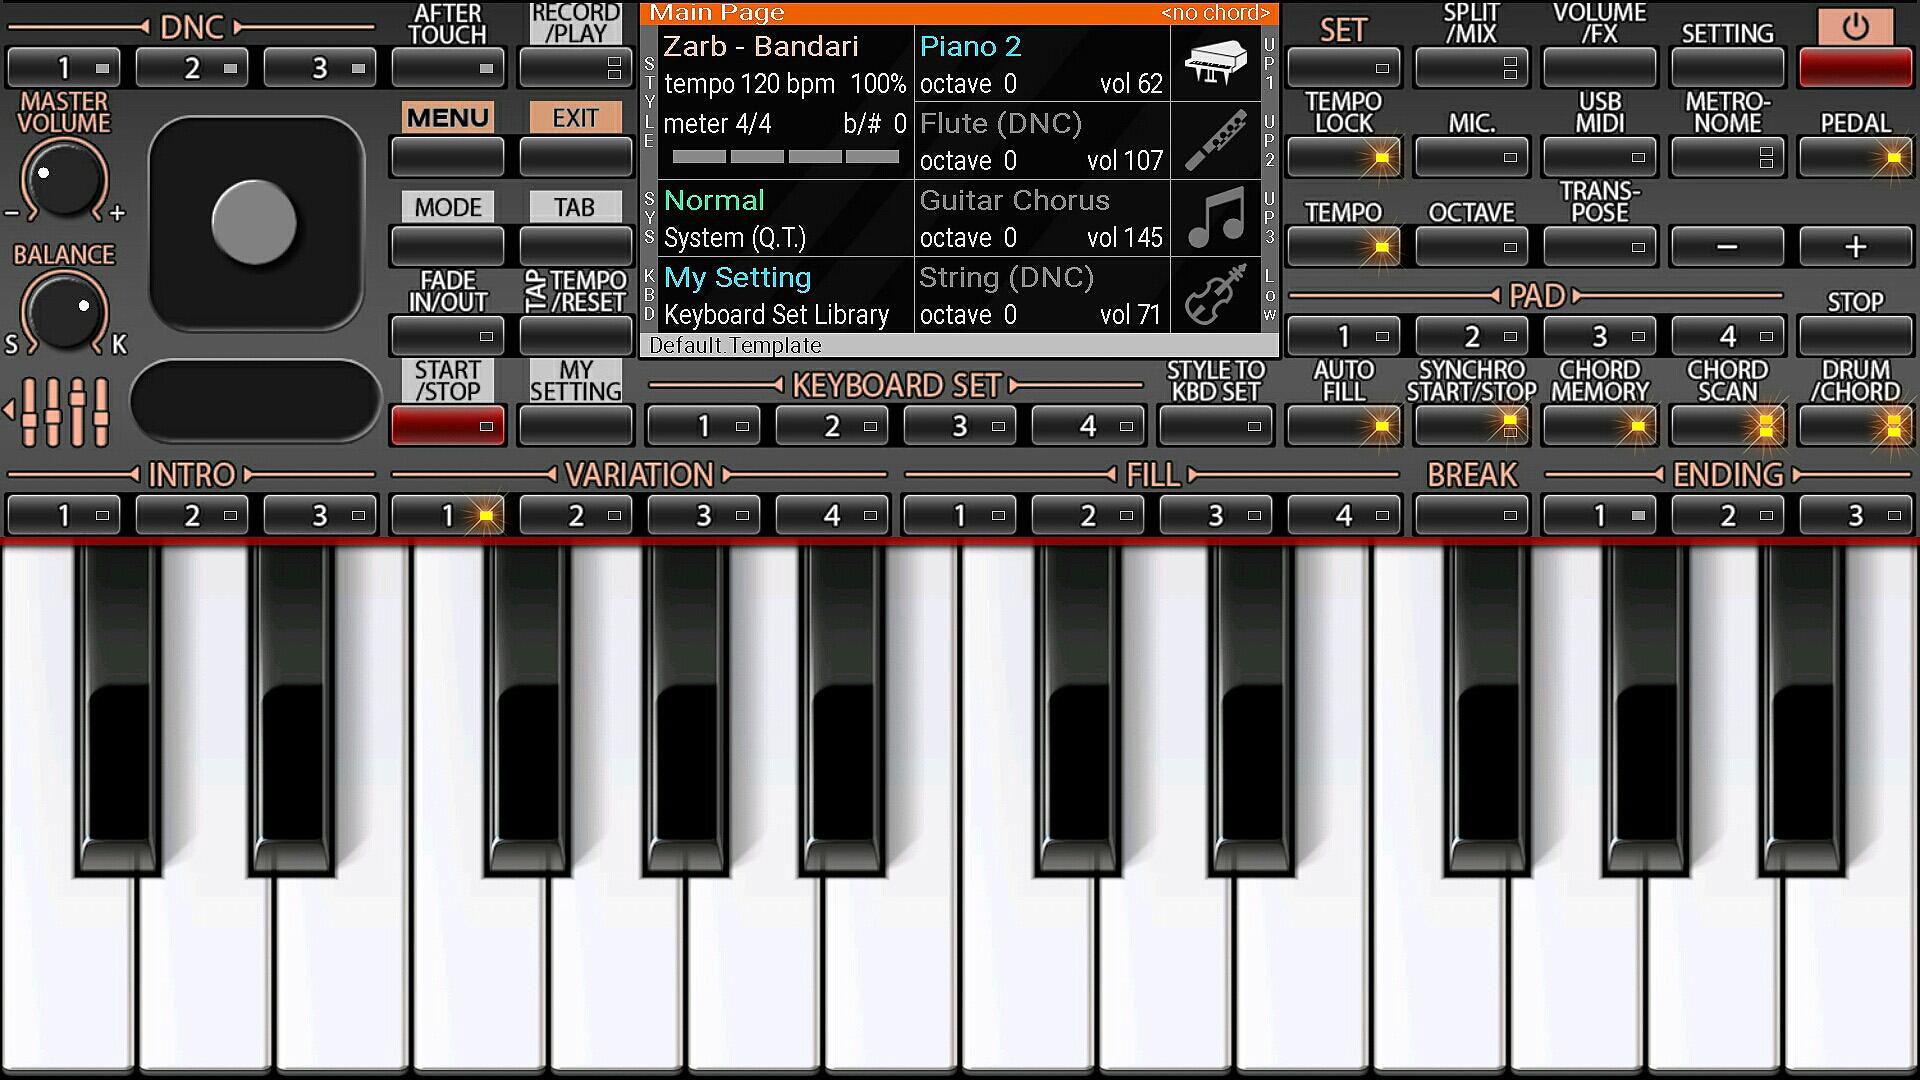
Now, since you want Appium to play most or all of your instruments, you need to find mobile apps which give you the ability to make the appropriate sounds. These are all over the place, however they're mostly of limited quality. I really liked one called "Souvey Musical Pro" but I can't seem to find it on the play store nowadays. For the bass part, I ended up using ORG 2018 on a Samsung S7.
For drums, I decided to play around with the WebAudio API and wrote a little sampler app. A sampler simply provides buttons that, when pressed, play pre-recorded sounds (the "samples"). Most of the apps of the kind I mentioned above are actually samplers (though some provide synthesized MIDI-like sounds instead, and sound worse). I called my little app WebSampler (many thanks to this HTML5 drum pad app for giving me some code to inspect and start hacking on), and it's basically a tiny bit of HTML, CSS, and JS that together enable the displaying of arbitrary buttons on the screen, linked to arbitrary .wav files. For the drums, I used some free samples I found online of a Pearl kit, and decided to run them via an iPhone simulator.
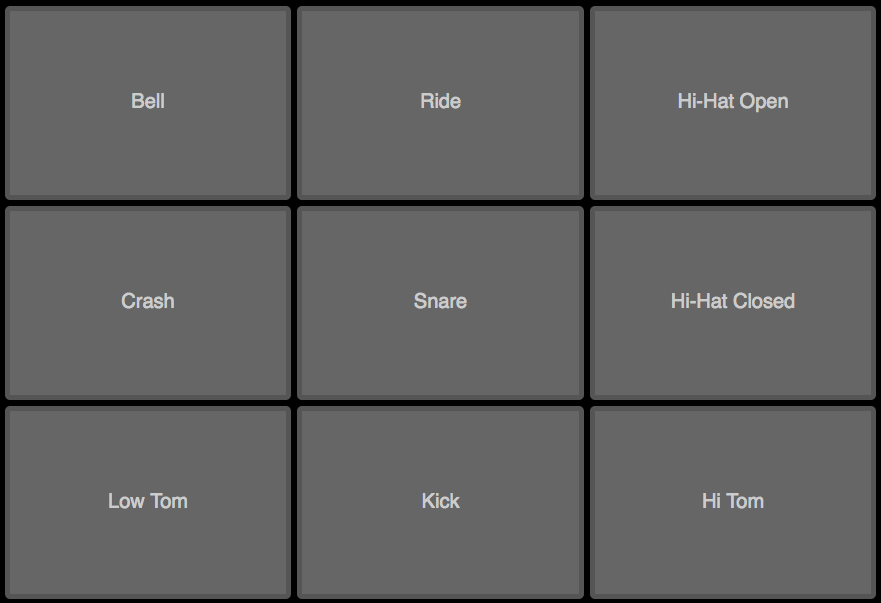
I then searched in vain for a way to play decent-sounding electric guitar parts using a mobile app. This is very difficult, because a guitar is physically set up very differently than keyboards, which are much more suited to being tapped on a screen. Unlike the simple bass guitar part I wrote, my electric guitar part required many notes to sound at the same time, and for pretty quick transitions between the notes. At the end of the day, I decided quality of sound was more important for my demo than faithful modeling of the playing of each note. So, I extended the WebSampler app to include a library of electric guitar samples, which I recorded from my own guitar using the Apogee Duet (which, incidentally, I cannot recommend more highly; it blows every other portable DAC out of the water). Essentially, each sonically-unique measure of the guitar part got sliced into a sample, and then given its own button in the WebSampler screen:

That accounted for all the instruments I wanted my robot band to automate, because I myself was going to sing and play the ukulele. I did, however, realize that my words would have a much bigger impact if they could be seen and not just heard, so I whipped up another little app I called WebWriter. Actually it's not even an app, it's just an HTML page with some basic styling and a single text box, whose sole purpose is to have Appium (or Selenium, as it turned out to be) write words into the box.
At this point, you have everything you need to make music. In fact, if you had some musically-inclined friends and a typist around, you could perform the digital version of your song now, with your friends tapping the sampler buttons or virtual keyboards. But our goal today is robot-driven rock, so we must press on.
Step 3: Teach Appium to Play the Mobile Instruments
Now we get to the core nugget of how Appium is involved in this whole picture. We need a way to automate the tapping and UI navigating that's required to make our mobile instruments work. Luckily, that's Appium's whole job. So for each instrument, create a class (or some other abstraction) which encapsulates the Appium commands necessary to:
- Get the app into the right state for playing the instrument (sometimes it's necessary to navigate through some menus, adjust the octave, etc...)
- Play a particular note or sound by tapping (either on an element or on a coordinate)
As an example of what #2 could look like, here's a code snippet from my ORG2018 instrument class:
async playNote (note, durationSecs) {
  let pos = this.posForNote(note);
  await this.tapPos(pos.x, pos.y, this.getRealDuration(durationSecs));
}
async playChord (chord, durationSecs) {
  const positions = chord.map(note => this.posForNote(note));
  await this.multiPos(positions, this.getRealDuration(durationSecs));
}
Basically, these are the core methods which take a note and a duration and turn it into actual taps on the device. In the case of this instrument, actual labeled elements were not available in the UI hierarchy, and so I had to construct a map of notes to x/y coordinates, which works based on percentage width of each key on the screen. You can see we have the option to play either a single note or a chord, using inherited methods called tapPos and multiPos (inherited from a base Instrument class). These methods are slightly more complicated, but it's essentially just plain old Appium code:
async tapPos (x, y, duration = null) {
  let action = new wd.TouchAction();
  if (duration) {
    action.longPress({x, y, duration: parseInt(duration * 1000, 10)});
    action.release();
  } else {
    action.tap({x, y});
  }
  await this.driver.performTouchAction(action);
}
async multiPos (positions, duration = null) {
  let actions = [];
  let multi = new wd.MultiAction();
  duration = parseInt((duration || 0) * 1000, 10);
  for (let pos of positions) {
    let action = new wd.TouchAction();
    action.longPress({x: pos.x, y: pos.y, duration});
    action.release();
    actions.push(action);
  }
  multi.add(...actions);
  await this.driver.performMultiAction(multi);
}
This is the core link between the world of Appium and the world of music. Everything else, as they say, is a simple matter of programming.
Step 4: Teach Appium to Read Music
Just because we have a nice way for Appium to hit some notes on a mobile instrument app doesn't mean it's a musician. To get to the next level, we have to teach it to read music. If we wanted, we could invent some crazy computer vision-based method for taking actual music notation (the kind humans read) and turning it into the playNote method above. This, however, is way too much work.
Instead, we'll devise a new kind of music notation which is much easier to write up as code. Basically, all we care about is ensuring that Appium hits the right note (or notes) at the right time. We don't care about dynamics, time signatures, or any of the other things which feature in actual music notation. So, what we can do is simply specify a sequences of notes and note durations in one long string. Take this string, for example:
c4 d8 e8 f8 g8 a8 b8 C4 r2.
The letters correspond to musical notes of the same name, in this case representing an ascending C Major scale. Most instruments can play several or many versions of the same note, placed at different octaves (multiples of a sonic frequency), but in ASCII we have only two ways of denoting the same letter: lowercase and uppercase. This means that our musical notation will be limited to 2 octaves (which is a practical limitation of most instrument apps anyway; octave changes happen outside the keyboard by tapping a button, for example). There's also a special letter "r" ("r" is not a musical note), which stands for "rest", meaning silence.
The numbers correspond to note lengths. Here we invert actual musical nomenclature, however: "4" means a "quarter" note (or one quarter of a full 4/4 measure), not "4 beats", because writing "1/4" is too clunky. "8" means an "eighth" note, "2" means a half note, and "1" means a whole note. A dot (".") after the number means to add an extra half of the specified duration. So c4. would signify a "dotted quarter note", or a note lasting for the duration of a quarter note plus an eighth note.
Finally, if we want to play a chord instead of a single note, we simply use the "/" character in between the notes that comprise the chord (as shown in this classic IV-I Plagal cadence):
f/a/C2 e/g/C2
Since, at the end of the day all we care about is notes and durations, a string with the specifications above is sufficient! Now all that's necessary is some code that can parse these string representations and turn them into calls to the playNote and playChord methods we saw above. In my own demo, for a variety of reasons, I separated this into two logically distinct components: first, a method that takes a tempo and a score string, analyzes the score, throws any errors, asserts appropriate length of the score based on other information, and finally returns a sequence of notes with their temporal offset already calculated. I pulled out this functionality because I wanted to run it in advance of the song, to avoid wasting any previous note-playing time trying to calculate or parse stuff.
Second, there is another method which takes the note sequence as input and simply calls the instrument play methods at the appropriate time for each note.
This is, in fact, how we get Appium to stick to the correct tempo. Each note it plays has a pre-calculated offset from the start time of the song. So, after playing each note, Appium can simply calculate how much time it should wait until it plays the next note. If it sees that it is running behind for whatever reason, it can drop notes and simply pick up with the next one it has a chance of hitting on time! Thus, as long as each instrument's part is kicked off at the same time, they can run completely independently of each other and still automatically correct for any lag, giving the illusion of keeping tempo with one another.
(In this section I focused on music notation, but let's not forget about our lyric writer "instrument"---what sort of notation do we use for writing lyrics in time with the rest of the instruments? You can see that notation here.)
Step 5: Teach Appium to Play Your Parts
Now that we have a nice simple spec for playing music in general, we have to commit our song to code. This is perhaps the most tedious part of the whole process, not least because our musical notation is very error-prone. Each part, even though it consists of thousands of separate notes across hundreds of different measures, needs to end up with exactly the same number of beats. If we'd wanted, we could have introduced the concept of time signatures and perhaps made it easier to cope with this kind of difficulty. But, since this is just a demo and not an app we need to maintain in production, we can just use good old-fashioned brainpower to carry us through.
Essentially, we want to end up with one score file for each part, each of which exports its score string. My song, for example, had a bass part with this code as a portion of its score file:
const LEADIN = ['r1 r1'];
const INTRO = ['r1 '.repeat(8)];
const VERSE = [
  'b4. b2 r8 ', 'f#4. C#2 r8 ',
  'e4. b2 r8 ', 'b4. b2 r8 ',
  'g#4. D#2 r8 ', 'f#4. b2 r8 ',
  'f#4. C#2 r8 ', 'f#4. C#2 r8 ',
];
const BRIDGE_PART = [
  'E2 E4 F#4', 'C#2 C#2',
  'a#2 a#4 C#4', 'b2 b2'
];
You can see here that I've separated measures as different strings for the benefit of my own sanity. And at the end of the file, I take all the different parts of the song and concatenate them back together into one big score string:
const SONG = [].concat(
  LEADIN,
  INTRO,
  VERSE,
  VERSE,
  BRIDGE,
  CHORUS,
  TAG,
  BREAK,
  VERSE,
  BRIDGE,
  CHORUS,
  TAG_2,
  OUTRO,
).join(" ");
module.exports = SONG;
I named the different parts of the song because there's a fair amount of repetition and it's nice to reuse the note segments rather then rewrite them. It's also nice to see the structure of your song laid out this way. It shows how simple and how repetitive it really is. If anything, I would say my song had a more complex structure than most pop songs, so hopefully yours is even a bit simpler.
(You can also take a look at all the parts for my song, including drums, guitar, and lyrics).
Step 6: Set Up Your Orchestra
The last bit of code we'll need to write is the bit which sets up all the various instruments and their respective drivers, triggers their startup routines, and finally kicks off the song for each of them. I've called this the Director, and it has a pretty simple job. And of course, when we hand off all the musicians to the director, we have to set up all the appropriate variables, like ports of the running Appium servers, and so on, so our code knows which Appium server is connected to which instrument, and so on.
What we end up with is the final piece of code, called song.js, which we can run to kick off our song. It's basically full of constant-setting boilerplate, apart from the important bit:
let d = new Director(TEMPO, true);
drums.analysis = d.addPart(drums, SCORE_DRUMS);
eg.analysis = d.addPart(eg, SCORE_ELECS);
bass.analysis = d.addPart(bass, SCORE_BASS);
d.addLyrics(lyrics, LYRICS);
try {
  await d.assemble();
  await d.play();
} finally {
  await d.dismiss();
}
Here we take our instrument objects, pass them into the Director, and then ask the director to play our song! Of course we wrap the song in a try block, because if something goes wrong (which can sometimes happen, unfortunately), we want to clean up our sessions.
Step 7: Perform Your Heart Out
The next and final step is something only you can do. Get up on a stage somewhere, kick off the Appium band, and sing and play your song with all the human passion and little imperfections that make for a truly engaging performance. And don't forget to let me know when you do, so I can check it out!
Speaking of little imperfections, I realized after I watched the video of my talk that there was a fairly serious bug in Appium's performance. At the last minute I decided to manually rotate the iOS simulator to landscape mode, however I inadvertently did so after the drum pad elements had already been found and their coordinates cached. The result was that for the entire song, the wrong drum part was being played! Luckily, it was still being played in keeping with the tempo, so it wasn't obvious to a casual listener (or even me, in the moment). A good reminder that something interesting and unforeseen is bound to happen in any live performance.
Anyway, if you've followed this tutorial, and added your own signature flair, what you'll have ended up with is something possibly very similar to the overall architecture that I've described in this article, which could be shown in a diagram like this:
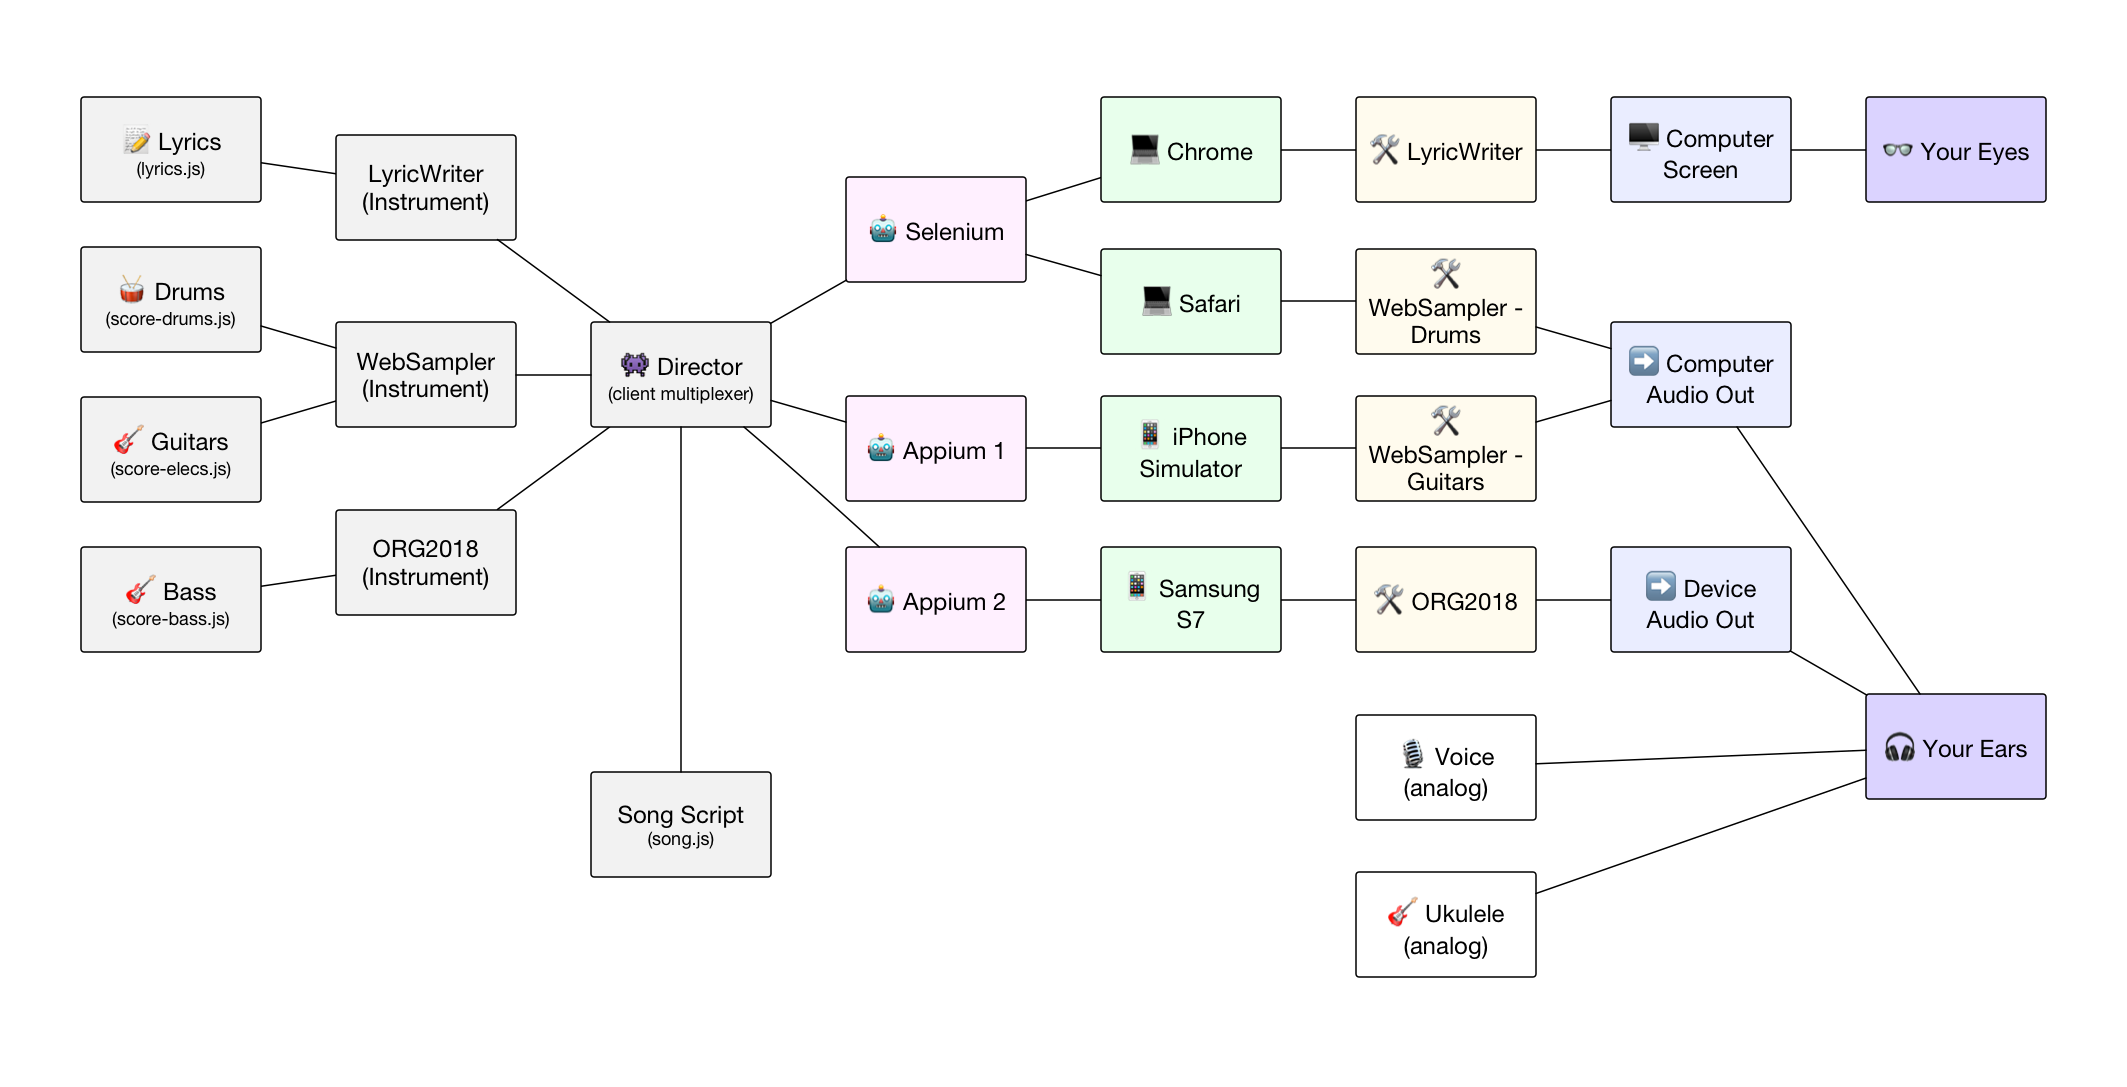
We've now reached the end of our little ratiocination on doing something extra crazy with Appium. Music is just one of many avenues, of course. As I told the attendees of my talk, we should all be looking for interesting and supposedly "frivolous" things to do with the technology available to us. If we only use our technology for boring and utilitarian purposes, we'll run the risk of becoming technologized ourselves. Don't forget to let the creativity out once and a while! I'll leave you now with the lyrics to my song, Ghost in the Machine:
[VERSE]
I believed the things I heard
Those that said I'm better served
Scanning my whole brain
And going digital
[VERSE]
So now that man is dead and gone
And here I am still humming along
But I can't shake the feeling that there's something wrong
[BRIDGE]
And feeling was the first to go
I never thought I'd stoop so low
But now I want my body back
Its limits seem a welcome lack
I'm hailed a virtual deity
But still no good at being me
[CHORUS]
I am the ghost in the machine
God of everything I see
But in my new reality
Eyes are a rare commodity
I don't just want to be a brain
I want to be a human being
But my mind's stuck in silicon
And I'm stuck inside my mind
[TAG]
I am the perfect simulation of
The not-so-perfect person that I was (x2)
So won't you get me out of here
[VERSE]
I review the memories
That I have saved of sun and trees
But one thing that I cannot do
Is feel them like they're mine
(Many thanks to Spareroom Studios in San Francisco for drum composition, general production, mixing, and mastering of the recorded version of the song)